Upgrade a Bladed 4.16 project using the command line
What you will learn
By the end of this tutorial, you will have learned how to use the command line to convert a Bladed project file (PRJ or $PJ) into the Bladed Next Gen JSON input format.
Note
Currently Bladed Next Gen supports the upgrade of ‘Aerodynamic Information’, ‘Performance Coefficients’ and ‘Steady Operational Loads’ calculations only.
Prerequisites
- Latest Bladed 4.16 installed in the default folder
"C:\DNV\Bladed 4.16". - Latest version of Bladed Next Gen and Samples installed.
- Licence for Bladed Next Gen (request a licence).
Tutorial steps
We have included a aeroinfo.$pj file for in the project_files_to_upgrade subfolder of the samples package for you to use.
Check you have the Upgrader tools correctly installed
Open Command prompt from windows start menu by typing
cmdand pressingenter.Type
bladed-upgrader -hon the command prompt that you have just opened.
Your command line should show you all the options on how to run the Upgrader, which you can also consult in the Upgrader reference documentation.
-PrjFilePath <String>
    The file selector that specifies which PRJ file is to be upgraded.

-OutputDir <DirectoryInfo>
    [Optional] The directory to which the upgraded JSON file will be written.

    This will default to the directory of the PRJ file being upgraded.

-OutputName <String>
    [Optional] The file name of the upgraded JSON file.

    This will default to the base of the PRJ file name.

-Force [<SwitchParameter>]
    [Optional] If there is already a JSON file with same name present no upgrade will be performed.
    Set this flag to force an upgrade.

-IgnoreVersionRestriction
  [Optional] If the PRJ file is not of the same version as the compatible version supported by the upgrader.You can use -Bladed4Version option to check the compatible version. The upgrading process will be cancelled. We advise you upgrade your project file to a compatible input before trying again.
  Set this flag to allow the upgrade to proceed and allow the old version of project file to be upgrade regardless of compatibility issues.

-Bladed4Path <String>

  [Optional] The path to the Bladed 4.16 installation
  Defaults to 'C:\DNV\Bladed 4.16'

-Quiet

  [Optional] To enable minimum console output
  Defaults to false

-Schema
  [Optional] To get the schema version of the Bladed Next Gen JSON file

-Bladed4Version
  [Optional] To print the version of Bladed 4 supported by the Upgrader.
To run this tutorial it is assumed that you have installed Bladed 4.16 in "C:\DNV\Bladed 4.16" if that is not the case all command lines in the following examples need to include the location of your Bladed 4.16 installation using the command -Bladed4Path <bladed 4.16 folder path> in the end of each command.
It might happen that your IT policy prevents you from running PowerShell scripts, in which case when trying to run the help command you will see the following error:

Despite this error, the upgrader will be able to run normally but you will not be able to see the help command list. Someone with administration rights needs to set up your Windows PowerShell to accept Remote Signed scripts using the following command on PowerShell:
Set-ExecutionPolicy RemoteSigned
Upgrade a project file
Keeping your command line open from the previous check:
- Type
bladed-upgraderon the command line, add a space before adding the file path of the PRJ or $PJ to be upgraded.
Tip
You can add the file path by dragging the file into the command line.
This will automatically include double quotation marks around the "<file path>" if the path has names with spaces, assuring the input is correctly read.
Your command line should look similar to this example:
bladed-upgrader "C:\bladed-ng-samples\project_files_to_upgrade\aeroinfo.$pj"
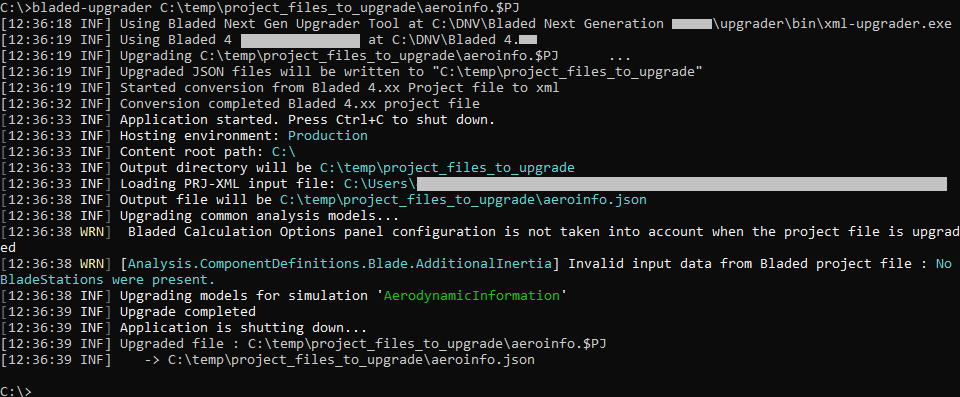
- Press enter to run the upgrade. You should get a response in the command line:
Note
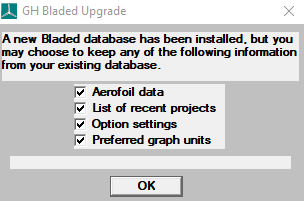
If you have installed Bladed 4.16 and have never opened it before running this tutorial you might be prompted by a pop-up GH Bladed Upgrade message that you will need to press the OK button on.

- Locate the upgraded Bladed Next Gen JSON file. By default the location of the upgraded project file will be output to the same folder as the Bladed 4.16 input file.
- View the upgraded calculation JSON inputs using your preferred code/text editor.
Congratulations, you’ve now upgraded your first calculation to the new Bladed Next Gen input format!
Customise the output file location
- To specify where to output the upgraded project file, you will need use the same command as the previous step but this time add the
-OutputDirflag, add a space followed by the desired folder location between double quotation marks.
Tip
Dragging the folder into the command line will add the quotation marks for you if the path has spaces in it.
Warning
Do not include a backslash the end of the folder path before the end of the double quotation marks \". This will be interpreted as an escape character and will assume that the quotation mark is part of the path name.
Your command line should look similar to this example:
bladed-upgrader "C:\bladed-ng-samples\project_files_to_upgrade\aeroinfo.$pj" -OutputDir "C:\Bladed-ng-outputs"
Overwrite an existing Bladed Next Gen file
- To overwrite an existing upgraded file you will need to add the
-Forceflag. Use the same command as the previous step but append-Force. In the command line, this will look similar to this example:
bladed-upgrader "C:\bladed-ng-samples\project_files_to_upgrade\aeroinfo.$pj" -OutputDir "C:\bladed-ng-files" -Force
Write an output log file
This is useful for troubleshooting if a calculation is not successful, especially for process automation.
- To write the output to a log file, append
>followed by the desired location and your custom name of the log file you’d like to output between double quotation marks. In the command line, this will look something like this:
bladed-upgrader "C:\bladed-ng-samples\project_files_to_upgrade\aeroinfo.$pj" OutputDir- "C:\bladed-ng-files" -Force > upgrader.log
Compare the PRJ and the JSON file
To compare the PRJ and JSON input files, find a map with correspondence of properties between Bladed 4.16 inputs and Bladed Next Gen 0.4.0. in the Migration section of the Documentation.
Run the new JSON file in Bladed Next Gen
To know how to run the new file in the new Bladed Next Gen, inspect and compare the result against the Bladed 4.16 equivalent output check how to run a simulation.
Warning
The upgrader does not assume any output folder where to write the outputs of a Bladed simulation. Therefore the JSON input file upgraded will not run unless the output folder is specified either inside the JSON file or in the command line by using the command line option -o <output_folder>.
Summary
You’ve learnt how to:
- Use the command line to upgrade a Bladed 4.16 project file to the new Bladed Next Gen JSON input file format
- Customise the output file location
- Overwrite an existing Bladed Next Gen file
- Write a log file
What next?
For more information on how to use the Upgrader you can use the Upgrader reference documentation.
If you are a developer, and want to automate the upgrade of multiple project files, take a look at the Python Bladed Next Gen Samples (0.5.2). For more information consult the README.md file included. Do not forget you will have to install the most up to date version of Bladed Next Gen's Python packages.


